


Products featured
Your customer has chosen what they want, added it to their cart, and made it all the way to checkout.
Now you need to help them finish the purchase.
Of course, that gets harder when the delivery charge comes as a surprise, the checkout form is a pain to complete on a phone, or the payment page suddenly looks nothing like the rest of your store.
So, what should your checkout include? Is a single-page layout always better than a multi-page checkout? And how can you tell which part of the process is costing you sales?
This guide walks you through the basic setup, four ways to improve checkout conversion, and how Ziina can help your UAE business give customers an easier way to pay without ever leaving your website.
In this guide:
- How to set up a checkout page for your ecommerce store
- 4 ways to improve your ecommerce checkout conversion
- Why UAE eCommerce brands use Ziina for a better online checkout
Ready to make the payment step easier for your customers? Connect Ziina to your eCommerce website like Shopify or WooCommerce, or use Embedded Checkout to let customers pay without leaving your custom site. Get started for free.
How to set up a checkout page for your eCommerce store
Every online store works a bit differently, so the exact setup depends on how your store was built.
But no matter where you’re starting from, a great checkout page starts with three core steps that make it easier for customers to convert:
Decide if your customers will use a hosted or embedded checkout to complete their payment
This choice shapes what customers see after they’re ready to pay and can narrow down which payment gateways will work for your online store.
A hosted checkout sends your customer to a new tab when it's time to pay. They land on a secure page managed by your payment gateway provider and complete the payment there.
Since the payment gateway provider is responsible for the payment page, there's less to customize and fewer decisions to make about the actual payment form.
An embedded checkout, on the other hand, keeps the secure payment form inside your own store's website. The customer can enter their card details or choose a digital wallet without moving to another page, so they stay within your branded online store experience from the moment they land on your site until the moment they pay.
This approach keeps your checkout consistent and on-brand, but you'll need a payment gateway that supports embedded checkout for your specific store setup.
When you're comparing payment gateways, check:
- If the provider works with your exact eCommerce platform or custom website
- Whether it offers hosted checkout, embedded checkout, or both through that integration
- If setup requires a ready-made plugin, help from a developer, or a custom API integration
It also matters which credit cards, digital wallets, currencies, and checkout languages the integration supports.
Configure the checkout form to be as easy as possible for customers
Once you’ve added your payment gateway, take a closer look at the checkout form itself.
Open the checkout editor in your platform or give your web developer a clear layout plan. Review every field on your form and decide what customers really need to enter at each stage.
The main job of your checkout is to clearly display the key order details with minimal distractions:
- Show item images, quantities, individual prices, and ideally, allow customers to make changes to their order right in the cart.
- Let shoppers select local delivery, express shipping, or physical store pickup.
- Calculate shipping fees, promotional discounts, and custom charges automatically.
- If your business is registered for VAT, set your checkout to add the standard 5% UAE VAT and make sure customers can see it in the total price before they pay.
- A clear error message should pop up if customers miss a required field or enter info in the wrong format.
- Customers should see an official order confirmation once they’ve successfully completed their payment.
The way you arrange your form fields matters just as much. For a single-page checkout, organize fields in a logical, step-by-step sequence. If you choose a multi-page setup, add progress indicators like breadcrumbs or a progress bar so shoppers always know how many steps are left.
The goal is for customers to check out with as little friction as possible while remaining secure.
With that in mind, you might also want to add a guest checkout option. Support for that is up to your eCommerce platform or your developer, but it’s worth looking into – and you can always set up post-purchase emails to invite customers to create an account after their purchase.
Test the entire checkout before publishing it
Place at least one real test order on both a computer and mobile before opening your store to real customers.
In practice, that means going through the checkout process using every available payment method, delivery option, discount code, and relevant customer location. Confirm that prices and taxes update correctly, required fields behave as expected, and customers see the right confirmation after their payment goes through.
You should also test your checkout page on a range of screen sizes and keep an eye out for what happens if a customer:
- Enters incomplete or invalid information
- Tries to use an expired or declined card
- Refreshes the page or presses the back button
- Leaves checkout and returns later
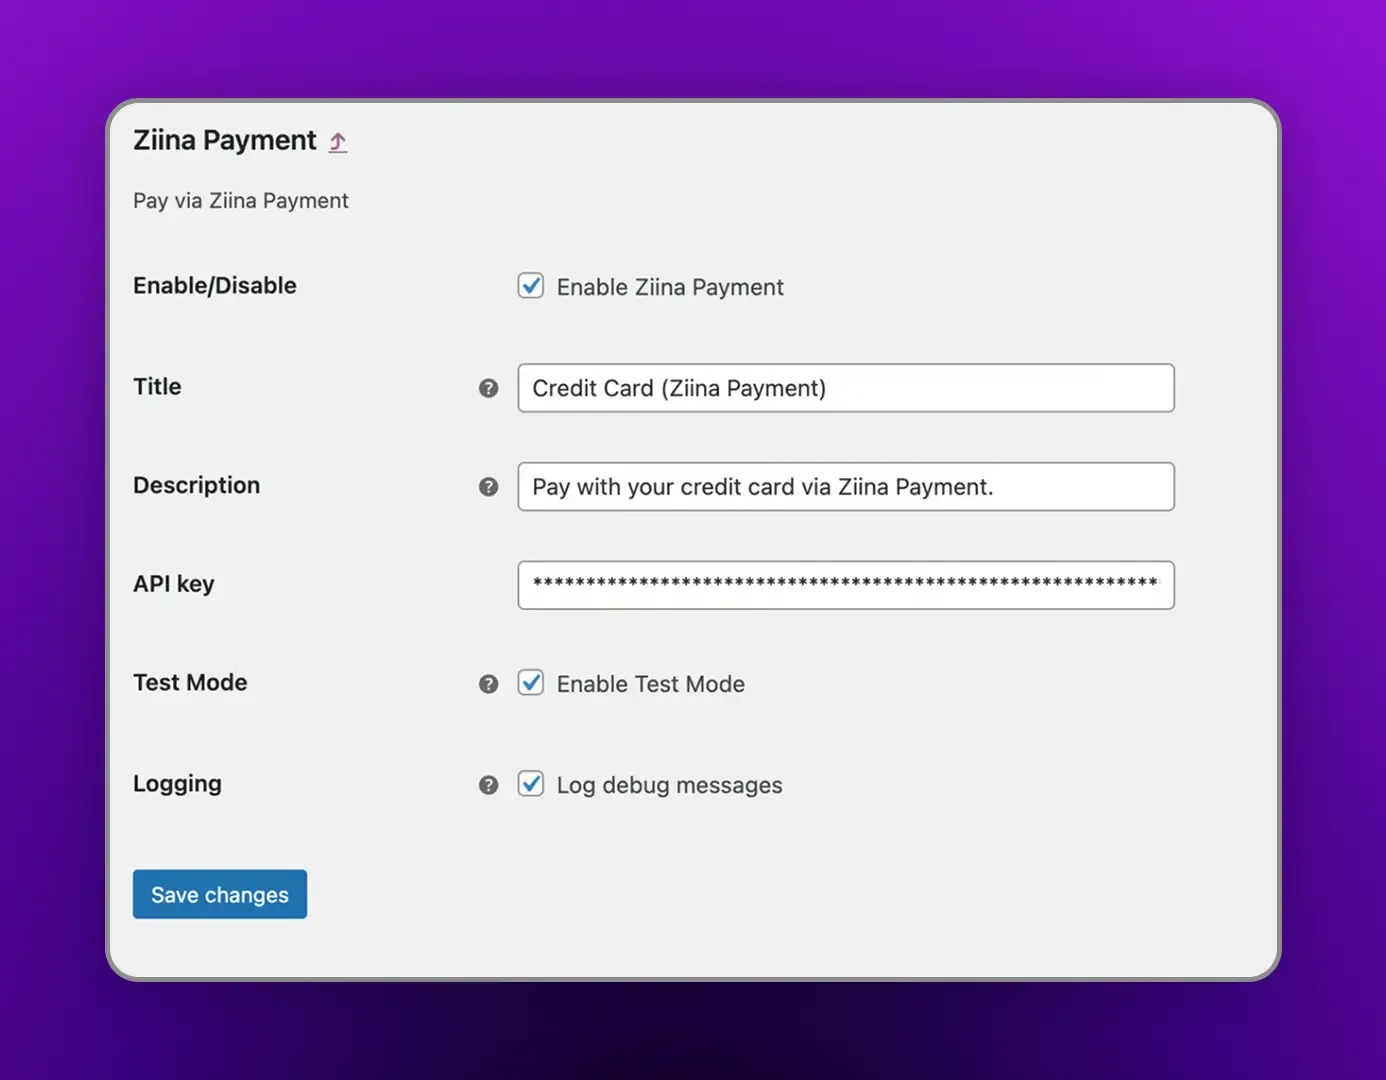
Some payment gateway providers offer a test mode so you can run a few transactions without moving real money around. For example, if you use Ziina's WooCommerce plugin, you can toggle on Test Mode to make sure everything functions smoothly before launch.
Once everything works as expected, you can publish the checkout. As real orders roll in, you’ll likely keep finding more ways to remove friction and turn more of those visits into completed sales.
Speaking of which…
4 ways to improve your eCommerce checkout conversion rate
A checkout page can look great on the surface and function perfectly behind the scenes – but still lead to cart abandonment if extra fees come as a surprise, the form fields feel exhausting, or the payment step looks unfamiliar.
Here are four practical ways to make your checkout flow easier for your customers to understand and complete:
1. Find out where customers are dropping off before you test any changes
There’s no need to tweak your checkout layout based on guesswork. Start by figuring out the exact payment step where customers tend to abandon the purchase.
If you use a platform like Shopify or WooCommerce, check the built-in checkout funnel reports. For custom websites, have your developer set up event tracking in tools like Google Analytics to measure each stage of the buying process.
No matter which analytics you use, you’ll want to track four main milestones:
When customers…
- Start checkout
- Submit their shipping address and contact information
- Reach the payment screen
- Complete the purchase successfully
The biggest drop between two stages tells you where to investigate. If customers leave before payment, look at the form to see if the delivery options or the way the total price is displayed could be causing hesitation.
If they leave on the payment screen, check your payment gateway logs to see if transactions are failing – if the logs look okay, your customers could be backing out due to something else on the front end, like not seeing their preferred payment method.
Once you have a likely explanation, test one change aimed at that problem. Then compare completed orders before and after the test.
Based on your findings, you might decide to…
2. Show the full price as early as you can
Seeing a new charge near the end of checkout can make customers think twice about the order. So, try to display shipping fees, estimated taxes, and any handling charges as early in the process as possible.
If shipping costs depend on the delivery address, add a note in the cart stating that delivery is calculated at checkout. As soon as the user enters their city or area, update the final total.
To make address entry more seamless for your customers – and reduce typing across devices – you could also add autofill and address lookup to your checkout form, depending on your setup.
On mobile devices, keep the total price summary visible or easily expandable with a single tap. Shoppers shouldn’t have to leave the checkout experience to double-check what they’ve entered or confirm how much they’re about to pay.
3. For each part of your checkout experience, ask yourself: “Do I really need it?”
The last thing you want is for the checkout form to slow customers down right when they’re ready to pay. To speed up the checkout flow, go through every field and make sure you really need each answer to complete the order.
Often, a question like “How did you hear about us?” can wait – so it’s best to save marketing questions for post-purchase emails or order confirmation pages.
Your checkout structure should also make sense with what you sell:
- Single-page checkouts work well for straightforward orders with fewer choices, but they’re not always the best move for more complex purchases where customers have to schedule a delivery window or choose other add-ons.
- Multi-page checkouts can keep the checkout sections visually clean for those more complex orders, but you’ll need to include a progress indicator and ensure customers can go back without losing info they’ve already entered to keep the experience low-friction.
No part of your checkout experience should feel like a hurdle. And that brings us to the final payment step…
4. Include the most common payment methods based on region and keep the page on-brand
For customers to confidently enter their sensitive payment details, the payment step of your checkout experience needs to feel secure, convenient, and recognizably on-brand.
That starts with your payment methods. UAE customers will expect to see major cards and familiar digital wallets like Apple Pay and Google Pay, so make sure those are available and easy to spot at a glance.
If you offer multiple payment options, the wording around each one matters, too. Customers should understand who is actually processing the payment no matter which payment method they choose.
For example, Ziina’s WooCommerce plugin lets merchants change the title and description customers see next to the Ziina payment option. You can use that space to clarify their options, like “pay by card via Ziina Pay” instead of leaving them guessing.
Why UAE eCommerce brands use Ziina for online checkout
Now that we’ve covered what your checkout needs, let’s talk about the part Ziina can help with: getting the payment setup right.
We’re a payment provider homegrown in the UAE, helping brands like yours accept payments across online checkout and other sales channels.
Whether you run a store on Shopify or WooCommerce or use a fully custom website, Ziina provides flexible options to process payments securely while keeping your brand front and center.
Here’s what you can expect when you choose Ziina to power your online checkout:
Get your website checkout live quickly
Whether you use a popular eCommerce platform or a custom build, getting your online checkout live with Ziina is straightforward. Ziina has ready-made integrations for Shopify and WooCommerce, so you don’t have to build the payment flow yourself.
And if you have a custom website and developer support, you can add Ziina using our APIs.
You can launch your checkout in a few steps:
- 1.
- 2.Choose the integration that matches your website.
- 3.Follow the setup guide, test a payment, and go live.
Voya Bakehouse would be the first to tell you just how much of a difference an easy-to-launch online checkout can make: the Abu Dhabi bakery had reached the point where their payment process was taking up to 30 minutes for each order. They chose Ziina to power their eCommerce checkout so customers could pay online more quickly, and the numbers speak for themselves.
In just a month, Voya reported a 200% increase in orders and higher customer satisfaction.

Keep your brand front and center while customers pay via an embedded checkout
Ziina Embedded Checkout places the secure payment form right inside your checkout page, so customers can go from reviewing the order to paying without being redirected to another website.
Right now, it’s available through our WooCommerce plugin and for custom websites through Ziina’s API.
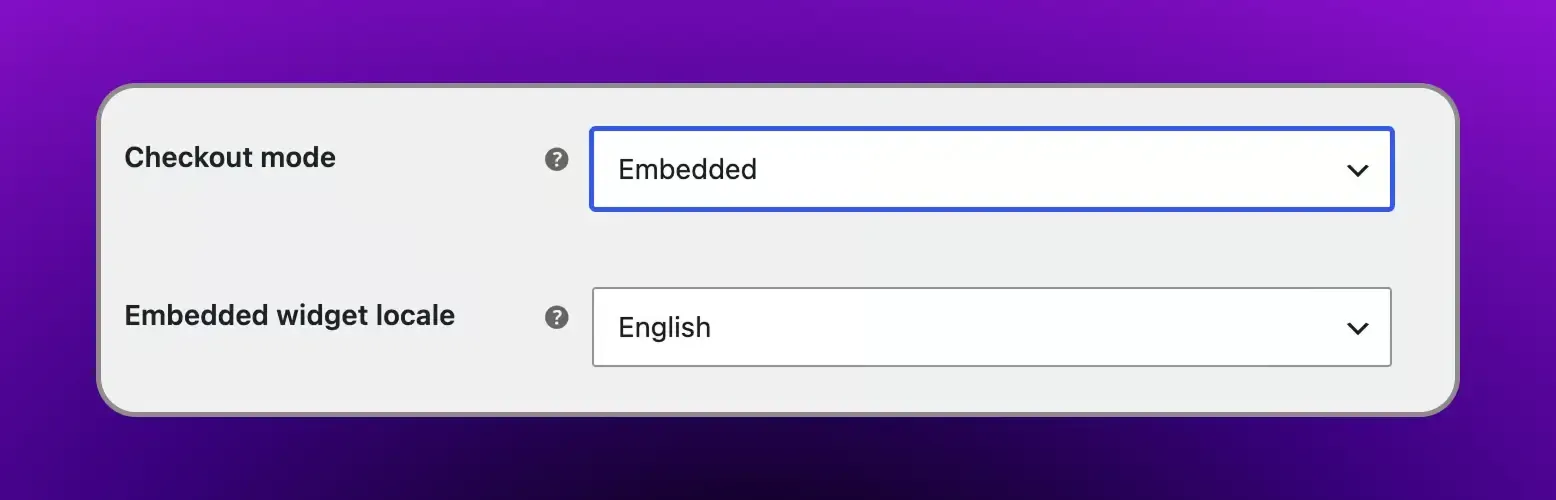
If you have a custom website, your developer can verify your domain and then use Ziina’s API to set up payment handling and display the payment form so customers can start ordering.
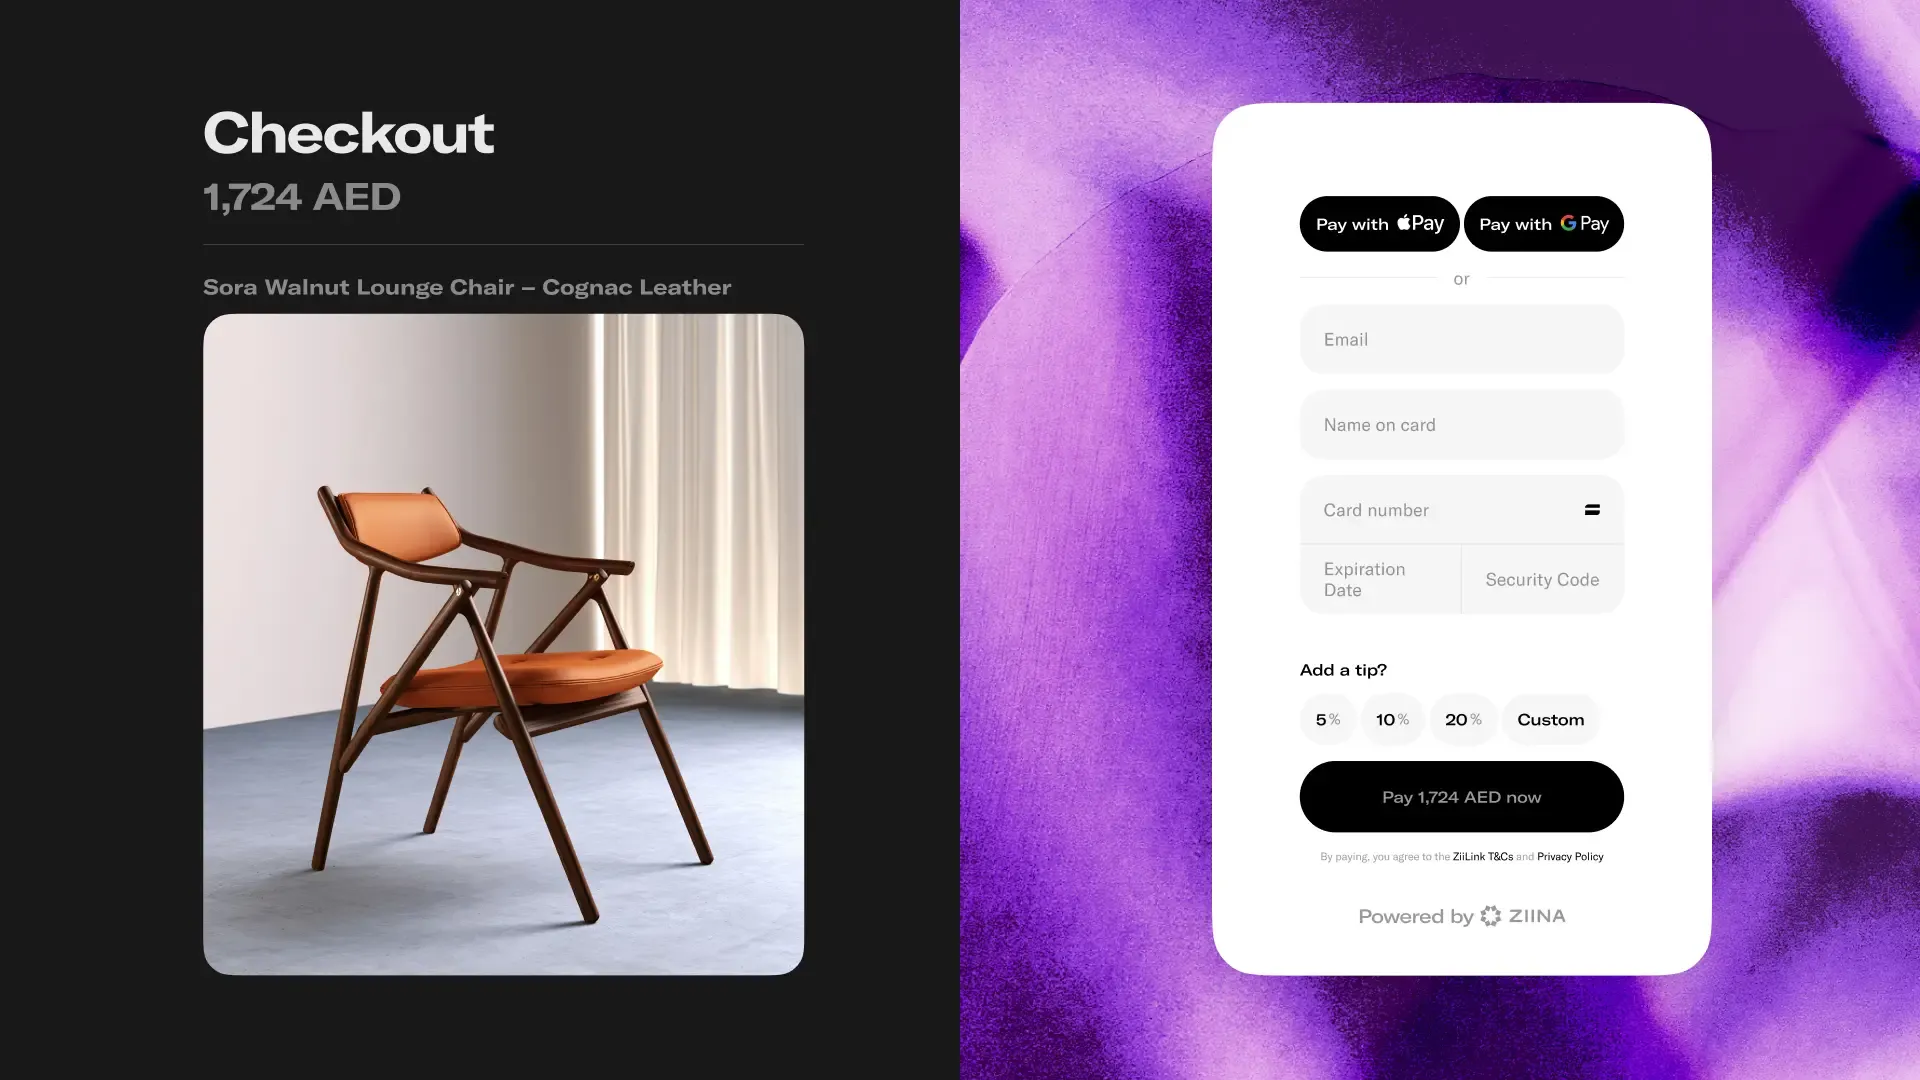
When you’re done, your customers will be able to see the Embedded Checkout payment form in English or Arabic. And with support for card payments, Apple Pay, and Google Pay, they’ll be able to use familiar payment methods without getting redirected away from your site.
That means one less page to load and fewer distractions between the customer and a completed purchase.
Give customers more ways to pay and keep sales in one Ziina account
Customers might buy through your website one day, place an order through WhatsApp the next, or visit you at a pop-up.
Ziina gives you a way to accept payments in each of those situations:
- Tap to Pay: Accept contactless card payments in person using a compatible phone.
- Payment links: Send a link through social media, SMS, or email. Our “ZiiBoard” keyboard extension allows you to create and send a checkout request without leaving your WhatsApp chat – it’s similar to how you’d switch to emojis, only for payment links instead. You can also turn these into digital invoices.
- QR codes: Let the customer scan a code and pay from their phone.
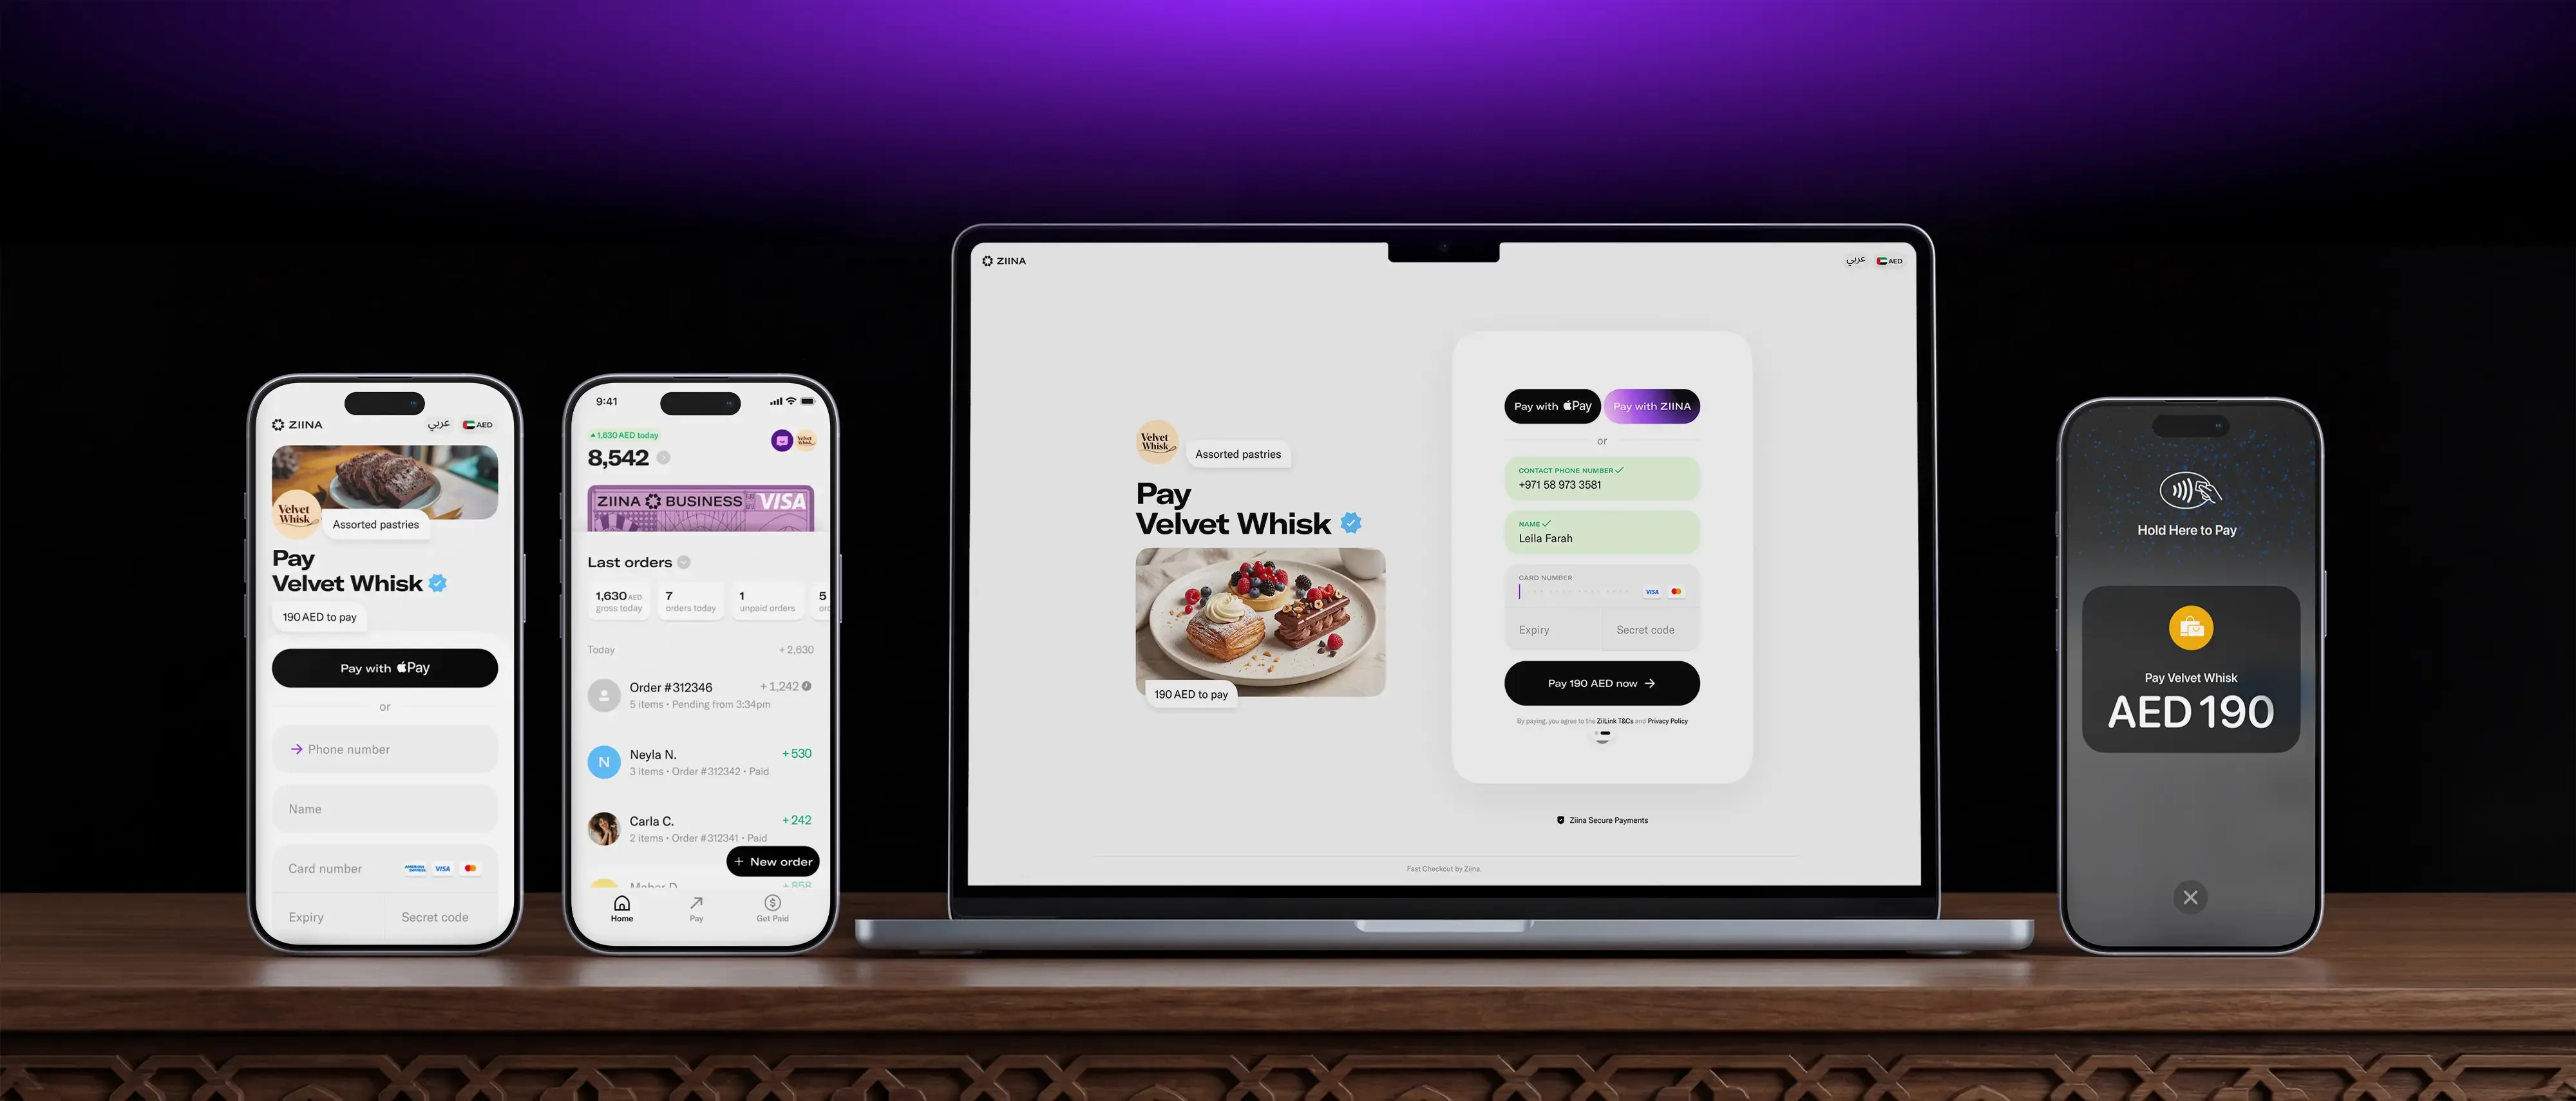
Website, social, remote, and in-person payments all land in the same Ziina account. Your customers get more convenient ways to pay, and you get to use the same platform instead of adding a separate provider for every sales channel.
Growing your team doesn’t mean sharing a login or giving everyone the same level of access. Verified Ziina Business Accounts include multi-user access, so more people on your team can take payments. The account owner can control who can manage sales and transactions.
Final thoughts
Your customer has already done the hard part: deciding to buy. Your checkout should help them act on that decision.
Ziina lets you connect payments to your store whether you use Shopify, WooCommerce, or a custom build. You can also use Embedded Checkout to keep the payment step on-brand and 100% within your own website, so customers never have to leave your shop before finishing their purchase.
Ready to make checkout easier for your customers?
Disclaimer: Availability of Ziina products and features is subject to eligibility, successful verification, device compatibility, applicable transaction limits, Ziina’s terms and conditions, and regulatory requirements. Customers are responsible for ensuring they hold any trade license, permit, tax registration, or other approval required for their business activities. Fees, limits, payout timelines, and product features may vary and are subject to change. Please refer to Ziina’s latest terms and pricing for full details. This article was published in November 2026.